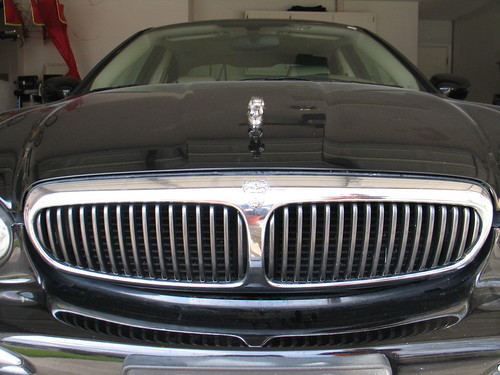
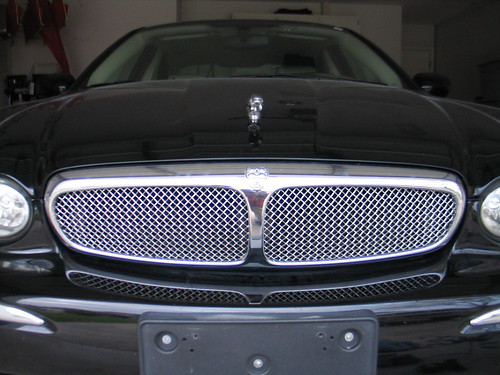
 The Jaguar X-Type hasn’t changed much since it was introduced in 2002. In fact even a Jaguar enthusiast would be hard pressed to tell the difference between an original year model vehicle and a brand new car, that is until you get to the grill. Along with new color choices, the 2008 model X-Type sports a Bright Mesh Grill, which adds a sporty touch and provides one of the only visual cues to distinguish the new model.
But if you’ve got a few bucks in your bank account, and have about an hour to spare, you can update your X-Type’s grill, and leave your friends and neighbors wondering where you got all that money for a “new” Jaguar.
Don’t be intimidated by this do-it-yourself project. The installation is relatively easy and even the least mechanically inclined among us should be able to get through it without much trouble. If not, you may want to get rid of your Jaguar altogether and think seriously about not driving at all. It is rather complicated, what with all the buttons and pedals and such.
Reasonably priced aftermarket mesh grill kits are all over eBay. I picked up a nice one from Welsh Enterprises for about $40.00 USD (yes, forty American dollars) including shipping. The grill kits on Welsh Enterprises’ own website are more expensive, so I’m not sure if the grills they sell on eBay are seconds. Nevertheless, the product quality is certainly up to spec, and their customer service is spot on. Shipping took less than a week.
You’ll need the following tools to install the grill:
- 10mm socket wrench
- Torx T-25 tool
- Phillips screwdriver
- Standard screwdriver with thin blade
- Cutting tool (jigsaw, Dremel, etc.)
- Sanding tool (rasp, small drum sander, etc.)
To get started, lift the bonnet and locate the four 10mm bolts that fasten the grill assembly to the bottom of the bonnet. They should come off without much effort, and after the first twist, you can probably unbolt them with just your fingers.


Once the grill assembly is removed, you’ll need to unscrew the three Torx screws that secure the rear part of the grill to the two-pieces in front (one in the bottom center and one in each lower corner).


There are plastic tabs on the top of the grill that fit together when the grill is fully assembled. The tabs closest to the end are snapped into place. You will need to use a small flat screwdriver or a thin rigid blade to carefully pry the end tabs apart.


Once the back piece is removed, you can easily unfasten the rest of the screws from the grill assembly.
Separate the chrome surround from the plastic frame, and be especially careful not to damage the frame as we will be using it to secure the wire mesh insert into place after the vanes have been removed. Be careful not to lose the two rubber stoppers near the bottom corners of the grill assembly.


Now would be a good time to make sure that the wire mesh insert fits properly. You don’t want to drive around a Jaguar with a toothless grin while you’re waiting on a replacement part.

Use a cutting tool to remove the vanes from the insert. The vanes provide much of the structural integrity of the plastic frame, so if you are using a reciprocating cutting tool like a jigsaw, you may want to leave a few vanes in place to keep the frame from flopping about while you’re cutting. A high speed pneumatic rotary cutter or a Dremel tool might be a better choice.


After the vanes have been cut away, use a small drum sander or a rasp to clean and smooth the inside of the plastic frame. This will keep the leftover plastic from being visible once the wire mesh insert is installed.

After aligning the chrome surround and the wire mesh insert, attach the plastic frame to the chrome surround, starting with the center screw. Adjust the frame and wire mesh insert as necessary, and then attach the remaining screws.


Reposition the rear portion of the grill assembly. Align the tabs and carefully snap the corner tabs back into place.
Reattach the three Torx screws to the grill assembly and then bolt the completed grill assembly onto the bonnet.

Now stand back and admire your Jag’s sparkling new smile!
Old and busted.
New Hotness!
Comments
Powered by Facebook Comments
Great photos and explanation. Thanks for sharing
Thanks!
Used your guide a week ago to install a stainless mesh insert. No problems whatsoever.
Cheers,
Bruce
excellent advice i must say i will certainly be trying this myself with my 2002 x type what a transformation.
I would also like to fit the leaper to which i have just recived problem is i dont know the correct spacing or measurements required. or how far away from the grille it should be do you know ?
kind regards nick
email-
[email protected]
thank so much my mesh came without instruction an you help me a lot. now i have to find out how to do the lower mesh
Looks great. – I’ve just ordered a stainless mesh insert kit from “www.adamesh.co.uk” for £60 – free delivery to UK addresses.
Not sure about the lower mesh though – at £99 I might leave it for a while.
Thanks for sharing
Regards
Frank
Many thanks for posting these valuable instructions …The “adamesh” grill looks duller in their site photo compared withn your welsh enterprises sourced grill material.
Will be keen to see a pic from Frank prior to my own planned x type slat to mesh upgrade !
Kind regards …Hughn
Fitted the adamesh grille to my 3.0 Sport last weekend using the excelent instructions and it looks great – considering the lower grille next !!!
Regards
Paul
darel,
great explanation. put the mesh grill in on friday. used dremel to cuts slats off and evertything went great. thanks for the post. one question though, would you happen to have directions for installing to the lower grill.
thanks
donny
[email protected]
I thought about fitting the very latest X-Type grill (after-market) at around £200, because Jaguar say the authentic ones they supply won’t fit a 2004 model like mine. I decided to go down the mesh insert route instead as I thought it might look a little bit “who’s he kidding”, plus the mesh-kit looks cool and understated whilst giving the car a more modern and sporty look, and it’s only £60! On Hugh’s point about the Adamesh ones looking duller, I mentioned this to the chap at Adamesh and he said that shiny chrome meshes tend to corrode and rust quite quickly compared to the polished stainless steel ones they supply.
Donny, I’ve never done a lower grill but the folks at http://www.jaguarforums.com and http://www.jaguarforum.co.uk will almost certainly be able to help. Try searching these two forums and there’s a good chance someone has published instructions.
Hi, I have seen some inserta dvertised on ebay with different hole sizes but I really like yours. Could you please tell me roughly what is th hole size on your mesh? i.e. is it about 7mm square or 10mm or bigger?
Thanks and Regards
Nav
The mesh on my X-Type is approximately 8mm. I would opt for the 7mm mesh if you like this look. Good luck!
to remove the splitter.take off the splash shield under neath .just a few screws…snap off the splitter cover.just pulls straight forward.then trim the 2 outer fins on the the inner splitter plastic mount..just the 2 outer fins..it will then slide out from underneath .the splitter is then still usable if you later desire to reuse it.
Great site. Many thanks, Darel. I saved your URL as a favorite! Looking forward to many more tips. Your new Fan in Ohio.
Briliant site, Dale. My wife kept asking me why I kept laughing out loud while reading how to change our Jag’s front grill! Great sense of humour ans very helpful. Thanks mate.
You’ll need the following tools to install the grill:
• 10mm socket wrench
• Torx T-25 tool
• Phillips screwdriver
you are still the only installation instructions on the net!………….Thank you!
I have to buy…. Torx T-25 tool what is actual size?